
PurpleForest, Part 1: Building an AD Purple-Team Lab from Zero
Stand up a Windows domain, a Graylog SIEM and Sysmon + Vector telemetry on one Windows host with VMware Workstation, Vagrant and Ansible.
purple-team active-directory detection-engineering graylog vector sysmon ansible vagrant homelab
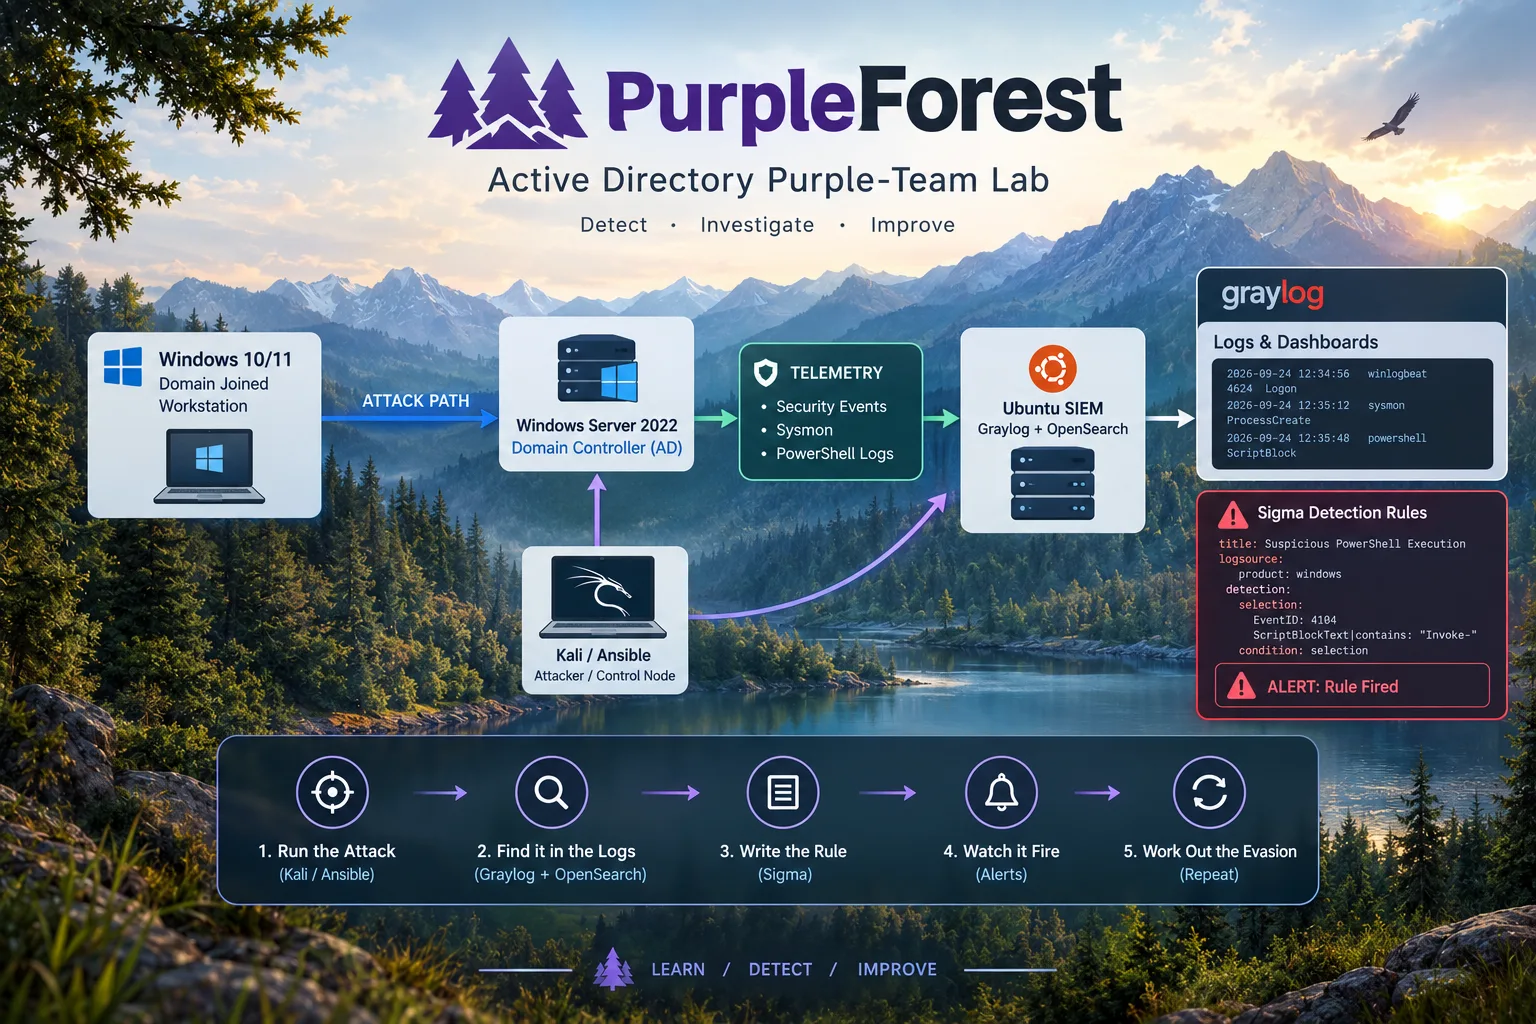
Every exercise in this series follows the same arc: run an attack, find it in the telemetry, write a detection, watch the alert fire, then try to evade it. None of that works without a lab where the attack and the logs live side by side. This post builds that lab. New to PurpleForest? Start with the introduction for what it is and why.
By the end you'll have a small Active Directory domain with realistic mess in it, a SIEM receiving Windows and Sysmon events from both Windows machines, and a Kali box that can reach all of it, plus a snapshot to reset to after every exercise.
Everything is in the repo: github.com/zebracherry/PurpleForest (there's a summary on the tools page).
I built this for real while writing the post, on my own machine, and a lot of it broke along the way: more than twenty separate things, from PowerShell execution policy to Vector not having a Windows event log source at all in the version I had pinned. Every one of them is fixed in the repo, so the steps below should run clean.
⚠️ Lab only. The passwords below are deliberately weak and published in a public repo, Defender is turned off, and the domain gets misconfigured on purpose. Never bridge the lab network to a real one, and never reuse these credentials anywhere.
#What you're building
| VM | Role | OS | IP | RAM |
|---|---|---|---|---|
| dc01 | Domain controller for corp.lab |
Windows Server 2022 | 10.10.10.10 | 4 GB |
| ws01 | Domain-joined workstation | Windows 10 22H2 Enterprise | 10.10.10.20 | 4 GB |
| siem01 | Graylog + OpenSearch + MongoDB (Docker) | Ubuntu 24.04 | 10.10.10.30 | 8 GB |
| kali | Attacker + Ansible control node | Kali Rolling | 10.10.10.50 | 4 GB |
All four sit on an isolated host-only network, 10.10.10.0/24. Each VM also
has a NAT adapter for internet access during the build.
Telemetry flows like this:
dc01 / ws01                                       siem01
┌──────────────────────────┐                     ┌─────────────────┐
│ Security, System,        │                     │                 │
│ PowerShell, Sysmon logs  │──► Vector ──GELF──► │ Graylog :12201  │
│ (windows_event_log)      │     TCP             │ Web UI  :9000   │
└──────────────────────────┘                     └─────────────────┘
Why ws01 is Windows 10 (end of life): Windows 11 requires a virtual
TPM, and in VMware Workstation a vTPM forces VM encryption, which breaks
snapshots. Snapshots are how you reset between exercises, so they matter more.
An unpatched, end-of-life endpoint is also exactly what you'd find in plenty
of real networks. If you want Windows 11 anyway, docs/windows-11.md in the
repo covers it.
#Requirements
- A Windows 10/11 host. Everything is orchestrated from the host, not from inside a VM. More on that below.
- VMware Workstation Pro 16.2+. I used 17.6. It's free for personal use.
- 32 GB RAM recommended. The lab uses about 20 GB with Kali, or 16 GB if you bring your own Kali.
- ~150 GB free on whichever drive you want the lab on. It doesn't have to
be
C:. - A decent internet connection. The Windows boxes alone are about 25 GB of downloads.
- About 2 hours end to end, mostly waiting.
#Step 1: Install VMware Workstation Pro
Download it from the Broadcom support portal. It needs a free account, which is why this is the one step the setup script can't do for you. Install it with defaults and reboot if asked. The setup script checks the version for you in the next step.
#Step 2: Run the setup script on the Windows host
This runs on the Windows host, in an Administrator PowerShell. My own
first attempt was to clone the repo inside Kali and run the scripts there. That
can't work: Vagrant drives VMware from the host, and a guest can't create
sibling VMs. The disk check also measures the guest's virtual disk rather than
your real drive. lab.sh now detects when it's inside a VM and tells you so.
Open PowerShell as Administrator, cd to the drive you want the lab on,
and run:
Set-ExecutionPolicy -Scope Process Bypass -Force
irm https://raw.githubusercontent.com/zebracherry/PurpleForest/main/lab.ps1 -OutFile lab.ps1
Unblock-File .\lab.ps1
.\lab.ps1 setup
What those first lines do:
-Scope Processchanges the execution policy for this window only, and it resets when you close it. Leave off the scope and PowerShell tries to change it machine-wide. If your PowerShell 7 came from the Microsoft Store, that fails with "Access denied" even as admin, because the Store app's folder is protected.Unblock-Fileremoves the "downloaded from the internet" mark (the Mark of the Web) that browsers andirmcan attach. Without it you get "is not digitally signed".
Setup asks two questions:
- Which drive? It lists your drives by free space and suggests the
biggest. VM disks, the ~40 GB of Vagrant boxes and all snapshots go there.
It sets
VAGRANT_HOMEso the boxes don't quietly fillC:. I pickedD:. TheTemp:entry is a drive PowerShell itself defines, not a real disk, so ignore it. - Already have a Kali VM? Say yes and it searches your usual VMware
folders for a
*kali*.vmxand lets you pick one. It found both of mine; I picked "Purple Kali". Your Kali is left alone apart from a new network adapter on the lab network, and the.vmxis backed up first. Say no, and Vagrant builds a fresh Kali.
It then clones the repo into <drive>:\PurpleForest and installs Vagrant and
the Vagrant VMware Utility. Both installers are checked against HashiCorp's
published SHA256SUMS before they run. Here's my first run:
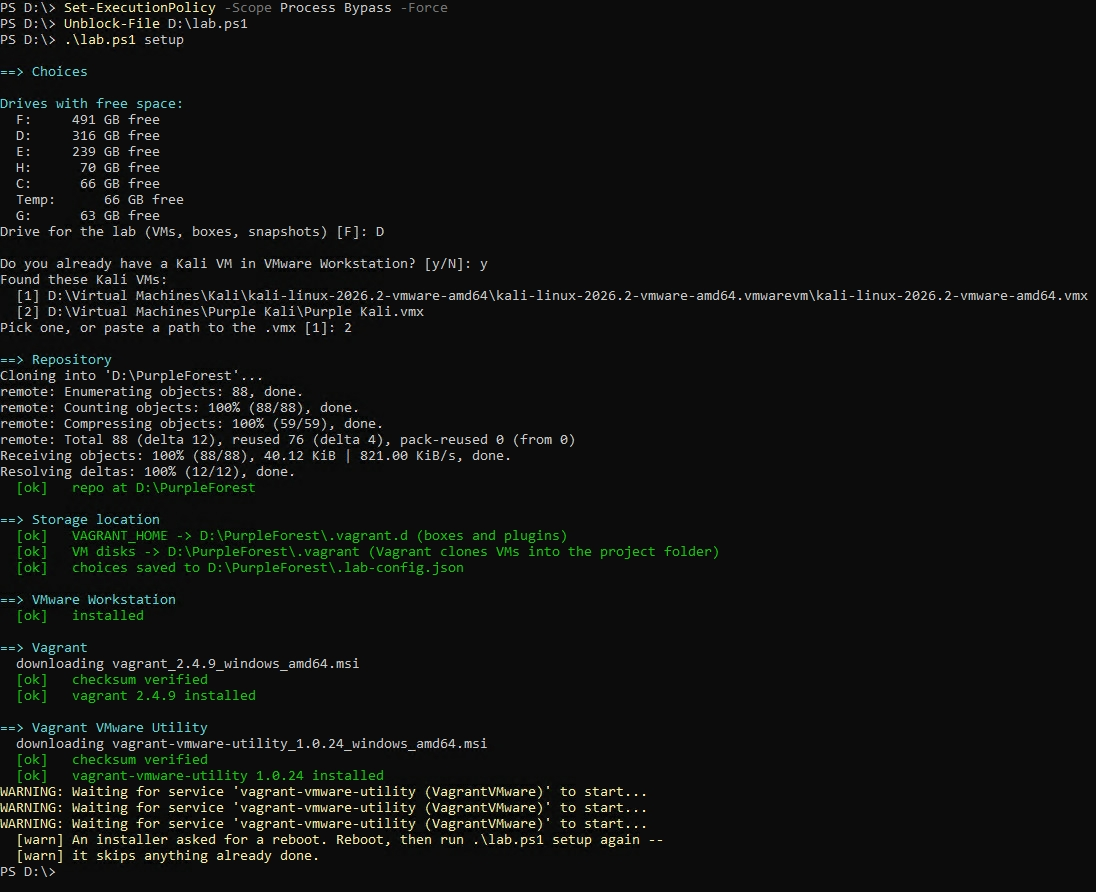
On a fresh machine the utility's installer asks for a reboot, and setup stops there on purpose. The "Waiting for service" warnings are the utility's service starting up, and they're harmless. Reboot, then run the same commands again. Setup is safe to re-run: it asks the same two questions, finds the repo and both installers already in place, and carries on with the plugin:
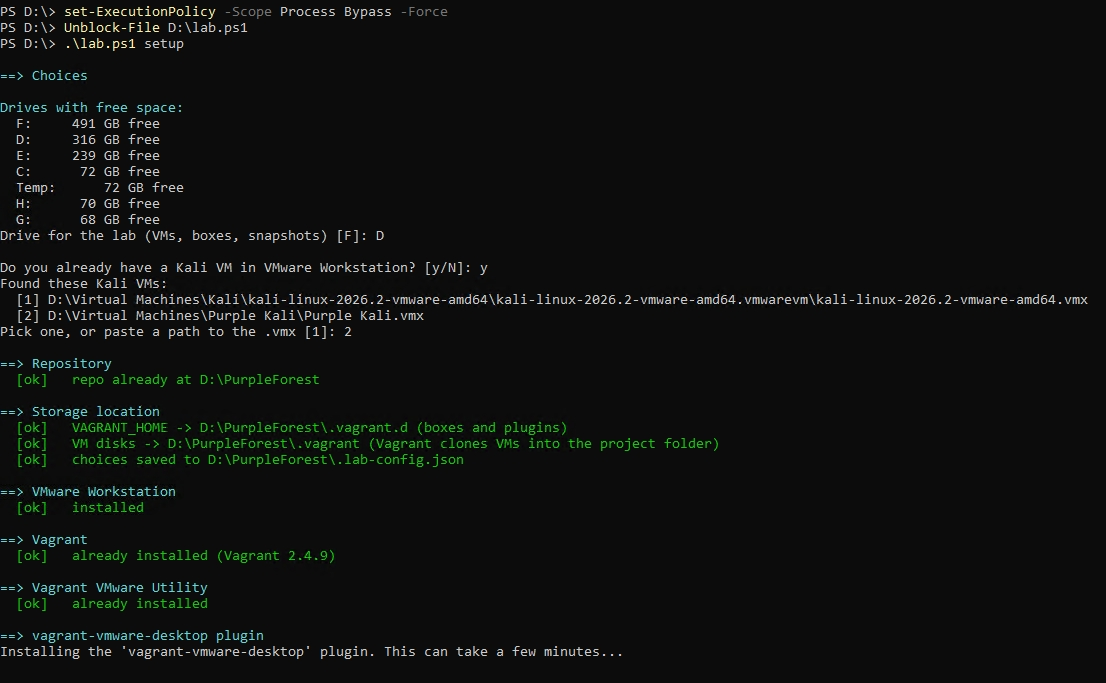
The plugin install takes a few minutes. Setup finishes with a prerequisite check, and you want every line green:
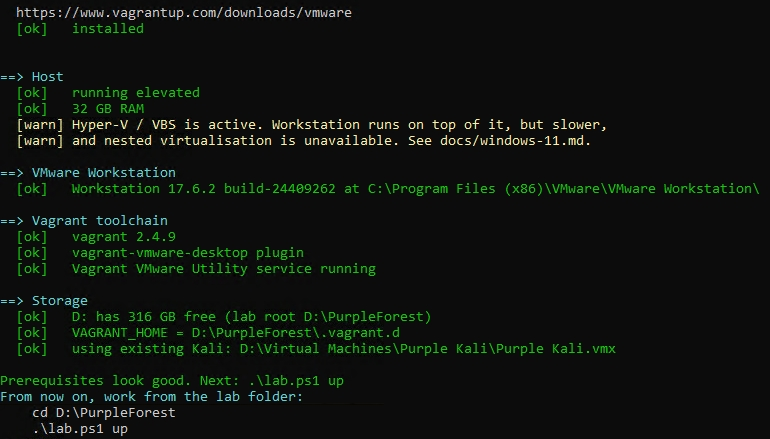
A Hyper-V / VBS warning here isn't a blocker. Workstation runs on top of Hyper-V, just a bit slower. If VMs are sluggish or refuse to boot later, it's the first thing to look at.
#Step 3: Bring the VMs up
Setup leaves the repo at <drive>:\PurpleForest. Work from there from now on:
cd D:\PurpleForest
.\lab.ps1 up
up re-runs the prerequisite check first, then builds dc01, ws01 and siem01
one at a time:
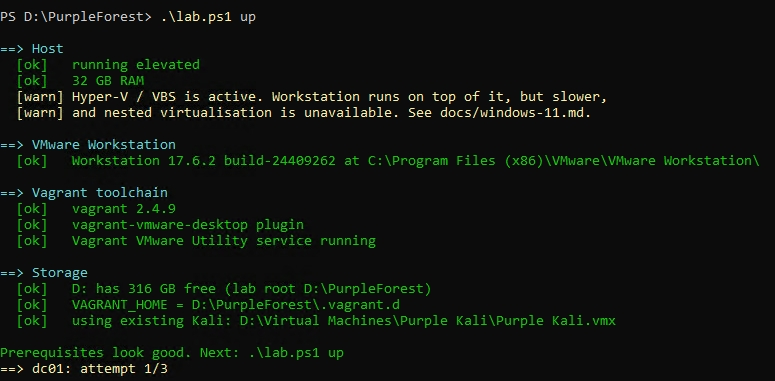
If you chose a Vagrant-built Kali, it builds that too; if you brought your own, it attaches yours instead. Expect 30–60 minutes, mostly downloading boxes. dc01 and ws01 open a VMware window; siem01 runs headless by design, since it's a server with nothing to show.
Where's siem01? Workstation's library only lists VMs opened through its GUI, so headless VMs don't appear there even while they're running. Confirm everything is up with:
.\lab.ps1 statusIf you brought your own Kali, up ends by attaching it to the lab network.
It reads which vmnet Vagrant created for 10.10.10.0/24 from dc01's
configuration, then adds a network adapter on that vmnet to your Kali's
.vmx:
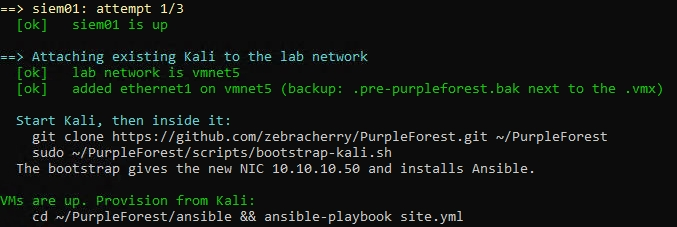
Kali has to be shut down for this step. If it's running, the script tells
you, and you re-run .\lab.ps1 up kali after shutting it down.
#Step 4: Prepare Kali as the control node
Everything from here runs inside Kali. Ansible provisions the other three VMs over the lab network. Start Kali and run:
git clone https://github.com/zebracherry/PurpleForest.git ~/PurpleForest
sudo ~/PurpleForest/scripts/bootstrap-kali.sh
The bootstrap does three things:
- It gives the new lab adapter
10.10.10.50/24through NetworkManager, with no gateway, so your normal internet route is untouched. - It creates a Python venv at
/opt/lab-venvcontaining Ansible and the WinRM libraries. - It installs the Windows, AD, Docker and general Ansible collections.
Kali's shell is zsh, and the script adds the venv to both .bashrc and
.zshrc, so open a new terminal afterwards.
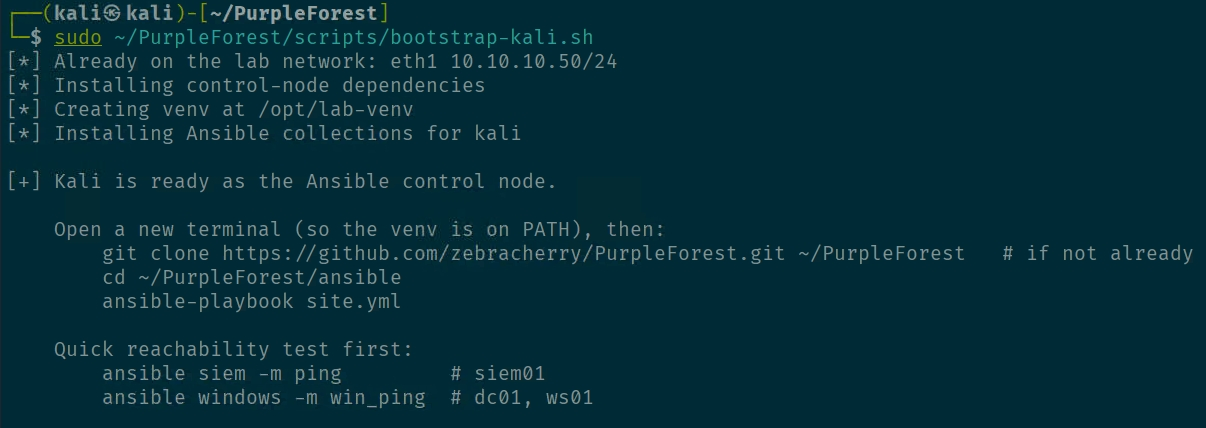
That screenshot is from a second run, which is why it says "Already on the
lab network". On the first run it prints Configuring eth1 as 10.10.10.50/24. My first run stopped at the apt step because an old
third-party repo on my Kali (Elastic 8.x) is signed with a SHA1 key, which
Kali's apt has rejected since February 2026. If you see "SHA1 is not
considered secure", disable that repo by renaming its file in
/etc/apt/sources.list.d/ to end in .disabled, then run the bootstrap
again. It's safe to re-run.
Before running anything big, check Ansible can reach every box:
cd ~/PurpleForest/ansible
ansible siem -m ping
ansible windows -m win_ping
You want pong from all three.
Plain ping to dc01 and ws01 will fail at this point, because Windows blocks
ICMP until the playbook opens the firewall. win_ping is the test that
matters.
If win_ping fails with "No route to host" while siem01 answers, the
VMware Vagrant plugin didn't set the static IP inside Windows, and the lab
adapter is sitting on a 169.254.x.x address. Set it from the Windows host
over Vagrant's NAT channel (use .20 and ws01 for the workstation):
vagrant winrm dc01 -c 'Set-NetIPInterface -InterfaceAlias Ethernet1 -Dhcp Disabled; New-NetIPAddress -InterfaceAlias Ethernet1 -IPAddress 10.10.10.10 -PrefixLength 24; Set-NetConnectionProfile -InterfaceAlias Ethernet1 -NetworkCategory Private'#Step 5: Provision the whole lab
ansible-playbook site.ymlThis takes 45–60 minutes. It runs in this order, because each piece depends on the one before:
- siem01: installs Docker, then Graylog, OpenSearch and MongoDB, and creates the GELF TCP input on port 12201. The SIEM goes first, so that telemetry has somewhere to land.
- dc01: promotes the server to a domain controller for
corp.lab. It reboots once. The first boot as a DC sits on "Applying computer settings" for a few minutes, which is normal. It then sets a DNS forwarder, creates the lab OUs, and runs BadBlood. - ws01: points DNS at dc01, joins the domain, reboots, and gets the same audit policy.
- Telemetry on both Windows boxes: installs Sysmon with the sysmon-modular config, installs Vector and registers it as a service.
BadBlood creates about 2,500 users, 500 groups, 100 computers and a pile of messy ACLs. That's the difference between a toy domain and one where BloodHound output looks real. It takes 10–20 minutes, and Ansible prints nothing while it runs. Open Active Directory Users and Computers on dc01 and refresh occasionally to watch the domain fill up.
A clean run ends with failed=0 on every host:
PLAY RECAP ********************************************************************
dc01      : ok=28   changed=11   unreachable=0    failed=0    skipped=16 ...
localhost : ok=1    changed=0    unreachable=0    failed=0    skipped=0  ...
siem01    : ok=11   changed=0    unreachable=0    failed=0    skipped=0  ...
ws01      : ok=24   changed=8    unreachable=0    failed=0    skipped=4  ...
The playbook is safe to re-run. If anything fails partway, fix it and run
ansible-playbook site.yml again; finished work shows as ok and gets skipped.
#Step 6: Verify the telemetry actually arrives
A green playbook tells you things got installed. It doesn't tell you data is flowing. Check it yourself before you trust the lab.
From Kali, open http://10.10.10.30:9000 and log in (credentials below). Go to Search, set the time range to Last 5 minutes, and you should see events from dc01 and ws01.
For a guaranteed test event, sign out of ws01 at its console and sign back in, then search:
event_id:4624If Search is empty, go to System → Inputs and look at Vector GELF TCP:
Messages are being received: the problem is on the Graylog side, usually field formatting.
Zero received: the problem is on the Windows side. Check the Vector service with:
ansible windows -m ansible.windows.win_powershell -a "script='Get-Service vector'"
Also confirm BadBlood did its job:
ansible dc01 -m ansible.windows.win_powershell -a "script='(Get-ADUser -Filter *).Count'"You should see a number in the thousands.
#Step 7: Snapshot everything
Before you attack anything, take the baseline. Back on the Windows host:
cd D:\PurpleForest
.\lab.ps1 snapshot
This snapshots dc01, ws01 and siem01 through Vagrant, and your own Kali
through vmrun (as purpleforest-baseline) if you brought one. After every
exercise:
.\lab.ps1 restoreEvery exercise starts from this snapshot, so you always attack a known-good lab.
#Credentials
| What | Username | Password |
|---|---|---|
| Domain admin | CORP\Administrator |
L4bAdm1n! |
| Vagrant account (dc01, ws01, siem01) | vagrant |
vagrant |
| DSRM (AD recovery mode only) | Administrator |
L4bSafeM0de! |
| Graylog web UI | admin |
L4bGraylog! |
All of these are set in ansible/group_vars/all.yml. Change them there before
provisioning if you like, and remember: lab only.
#Cheat sheet
| Where | Command | What it does |
|---|---|---|
| Windows host | .\lab.ps1 setup |
Install tooling, pick drive, choose Kali |
| Windows host | .\lab.ps1 check |
Verify prerequisites, change nothing |
| Windows host | .\lab.ps1 up [vm] |
Create all VMs, or one |
| Windows host | .\lab.ps1 status |
Show VM state |
| Windows host | .\lab.ps1 snapshot |
Save the baseline |
| Windows host | .\lab.ps1 restore |
Roll everything back to baseline |
| Windows host | .\lab.ps1 destroy |
Delete lab VMs (never touches your own Kali) |
| Kali | sudo scripts/bootstrap-kali.sh |
Set up the control node |
| Kali | ansible-playbook site.yml |
Provision or re-provision the lab |
#If something breaks
The repo's troubleshooting guide covers the problems you're most likely to hit: Vagrant failing to start, Windows provisioning timing out, the domain join failing, and events not arriving in Graylog. If yours isn't there, open an issue.
#What's next
The lab is built, the telemetry arrives, and the baseline is saved. That's everything the exercises need. I'm planning them now, and I'll be back soon with the first one.
If you build this and hit something that isn't here, open an issue on the repo. Every fix makes the next person's build smoother.